
Are you someone looking to learn React by working on a sample project? If you want to build a react sample project and learn the essentials then this blog is going to help you out!
Projects are practical and will help you understand the underlying concept more deeply. The same is true if you want to learn React as well.

I will walk you through a simple example project that you can do purely using React without depending on any other third-party library.
In this blog, I explain the concepts of React like states, props, and many more. So, stick with me till the end and learn React together with this small project.
What Will You Learn?
Basic Installations
Start the project. You need some of the tools pre-installed in your local system.
You have to install Node in your local. You can download the node application from this link.
After you have successfully installed the node in your local, you can create the react project from scratch using the following commands.
npm create vite@latest
Remember that apart from Vite, there are many other tools you can use to build your basic project setup. In this project, we are using Vite.
After running the command line – you have to follow along with me.
? Project name: » first-app [ENTER]
Then Choose React.
Then Choose Javascript.
After this, you will get the folder first-app and this is the starting point of your React project.
Go inside this folder – cd first-app
Then run the command to install the packages – npm install
It is going to install all the packages needed for you to start your React project.
To run the project in the browser – npm run dev
It will open the app at localhost:5237. You can type it manually or CTRL + Click on the link in the terminal.
React Sample Project Outcome
The outcome of this blog will be an interface where you can have multiple tabs that you can click. For every click of any of the tabs, some information will open up and you’ll be able to read that information about that tab.
The interface will look something like this –
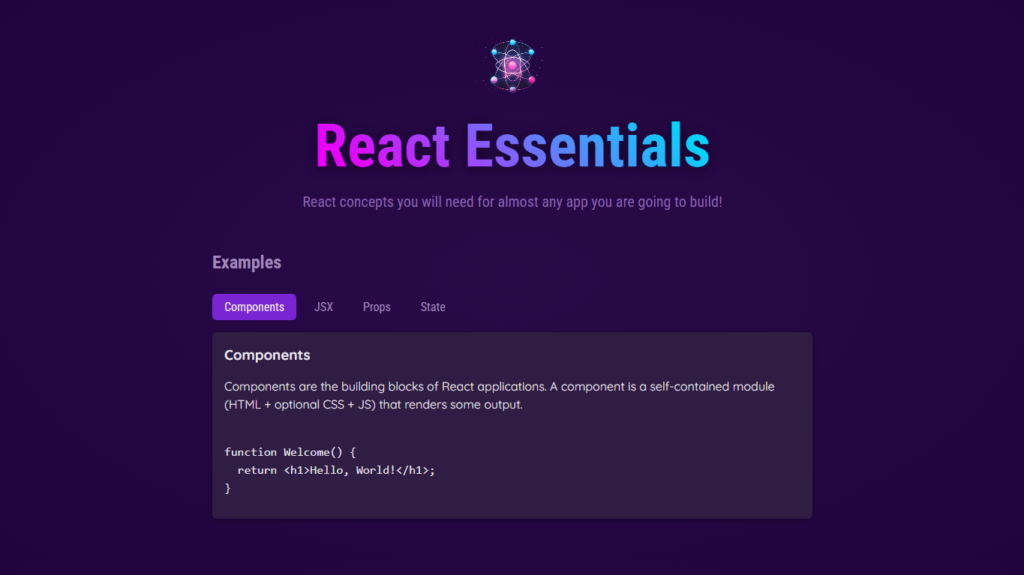
Interface has two parts, one is the header part and another one is the tabs part. In React, these parts are also known as components.
Component in React
Component Concept
In React, components are the building blocks that make up the whole interface. Components are the reusable blocks of code that you can use throughout your application multiple times. It helps you organize your code in one place and reuse it multiple times.
How will you start thinking from the component perspective?
This project if you closely look at the interface you will notice that multiple blocks make up this whole interface.
One is the header component. Another one is the tabs component. Let’s look at the header component first and understand how you can build components in React.
Component Examples
The code to build Header the component looks something like this –
import reactImg from "../../assets/react-core-concepts.png";
import "./Header.css";

export default function Header() {
  return (
    <header>
      <img src={reactImg} alt="Stylized atom" />
      <h1>React Essentials</h1>
      <p>
        React concepts you will need for almost any app you are going to build!
      </p>
    </header>
  );
}
While the code may look overwhelming, it is fairly easy.
Component has one thing in common, that is every component returns some JSX code.
JSX code looks very similar to HTML code, so you can think of JSX as HTML in JavaScript.
If you are familiar with HTML then writing JSX code is pretty easy. One thing to remember that is while writing JSX code you have to make sure that the properties that you use in HTML, will be in CAMAL case. Any property that had a hyphen in HTML will be replaced by camel case style. E.g. onclick -> onClick. Also, in JSX class is not a property instead we use className.
After building this component, you can use this component in multiple places in your application.
Although the header component is not a component that will make sense to use multiple places because it is something that is used as the first component in the interface. Instead, if you have multiple pages then it will make sense to put this header component in multiple pages component codes.
The second component we will name it as Examples.
The Examples component will contain some complex code that we will be explaining in a later part, but for now, let’s look at the code that we will be writing for the Examples component.
import { useState } from "react";
import { EXAMPLES } from "../data.js";
import TabButton from "./TabButton.jsx";
import Section from "./Section.jsx";
import Tabs from "./Tabs.jsx";

export default function Examples() {
  const [selectedTopic, setSelectedTopic] = useState();

  function handleSelect(selectedButton) {
    setSelectedTopic(selectedButton);
    console.log(selectedTopic);
  }

  let tabContent = <p>Please click any topic.</p>;

  if (selectedTopic) {
    tabContent = (
      <div id="tab-content">
        <h3>{EXAMPLES[selectedTopic].title}</h3>
        <p>{EXAMPLES[selectedTopic].description}</p>
        <pre>
          <code>{EXAMPLES[selectedTopic].code}</code>
        </pre>
      </div>
    );
  }

  return (
    <Section id="examples" title="Examples">
      <Tabs
        ButtonsContainer="menu"
        buttons={
          <>
            <TabButton
              isSelected={selectedTopic === "components"}
              onClick={() => handleSelect("components")}
            >
              Components
            </TabButton>
            <TabButton
              isSelected={selectedTopic === "jsx"}
              onClick={() => handleSelect("jsx")}
            >
              JSX
            </TabButton>
            <TabButton
              isSelected={selectedTopic === "props"}
              onClick={() => handleSelect("props")}
            >
              Props
            </TabButton>
            <TabButton
              isSelected={selectedTopic === "state"}
              onClick={() => handleSelect("state")}
            >
              State
            </TabButton>
          </>
        }
      >
        {tabContent}
      </Tabs>
    </Section>
  );
}
Let’s break this component down into multiple pieces and understand each piece one by one.
First, you can see that we are using something called useState. useState is a hook that helps in creating states in react.
What are states?
States in React
States are variables in React that help the application react to different user actions and change the interface accordingly.
States are variables. But unlike normal variables in JS, a state in React acts as an indicator of the whole application and notifies the application of any changes happening to it. It is up to the application to decide how the interface will change depending on the change of the state.
For example, if we have a state for error that determines whether the HTTP request sent to server fails or not – in case of failure the error will notify the application that an HTTP request error happened and then the application might decide to show an Error interface to the user depending on the error state value.
For example – we have a state called selectedTopic. It tracks the topic the user has selected out of the 4 topics and can have any one of the 4 values – Components, JSX, Props and State.
We can decide how we can use this state to change the interface. In this example, we are changing the interface depending on the value of this state by showing a piece of different information about the topic that the user has selected.
Change the value of the state using setSelectedTopic function. To change the state value we depend on an event, that is click event on any one of the tabs.
We have to pass this function to the event onClick which is one of the props in the component tab.
So, what are props?
Props in React
Props Concept
Props are simply arguments passed to the component. They have a special structure that we need to always follow so that we make sure that we are passing the props the way React wants.
If you want to pass properties or props to any of the components, we have to pass it using properties.
Make sure when we are using any kind of value or variables inside the JSX code, you wrap them up inside curly braces ( {} ).
In the component, how you are going to take these props?
Props in Component
Inside the component if you want to catch the properties that are passed to this component you have to write something like this –function Tabs({button}) {
return <>…;
}
Every component accepts children property which points to the content that is inside of this component call, e.g. A Tab – Here children takes the value of A Tab. To catch the children value, you have to mention in the component – function Tabs({button, children}) {}
Multiple other props could be passed to this component. In that case, instead of using the names of every property in the component props list, you can specify …props to catch all the remaining properties that are not mentioned.
Example:function TabButton({children, isSelected, …props}) {}
<TabButton isSelected={selectedTopic===”components”} onClick={() => handleSelect(“components”)} />
...props will catch the property onClick passed to TabButton.
Pass components as a property to other components. To use Component prop to other components, you have to follow the naming convention of components.
For example:
function Tabs({buttons, ButtonContainer}) {}
The component name starts with a capital and then follows the Camal case.
You can use this component prop inside your component just as you use them for other custom components – <ButtonContainer>{buttons}</ButtonContainer>
The code to implement the Section component –
export default function Section({ title, children, ...props }) {
  return (
    <section {...props}>
      <h2>{title}</h2>
      {children}
    </section>
  );
}
To implement the Tabs and TabButton –
export default function Tabs({ children, buttons, ButtonsContainer }) {
  return (
    <>
      <ButtonsContainer>{buttons}</ButtonsContainer>
      {children}
    </>
  );
}
export default function TabButton({ children, isSelected, ...props }) {
return (
<li>
<button className={isSelected ? "active" : undefined} {...props}>
{children}
</button>
</li>
);
}With this, we are done with all the essential concepts you need to know in React.
Lastly, to build the application, we need to put all our code inside the app.jsx file. Your React application starts from main.jsx. In this file, React will render the App component at the element with id=”root“. So, we need to put all the components together inside the App component.
import Header from "./components/Header/Header.jsx";
import Examples from "./components/Examples.jsx";

function App() {
  return (
    <>
      <Header></Header>
      <main>
        <Examples />
      </main>
    </>
  );
}

export default App;
And we are done with our small sample react project!!
Full Code and Folder Structure can be found on GitHub.
Want to further improve your understanding in React by doing another project? Dive into this video👇
Conclusion
In this blog, I tried to explain the essential concepts of React using the sample React project. The project is pretty simple and uses very beginner-friendly code.
To explore a lot more things in React, you can extend this project to incorporate some other concepts like ref, hooks, side effects, etc.
Remember, whenever you are learning React, projects are one of the best ways for you to learn and apply React.
Want to become a Full Stack Developer but don’t know what their life looks like? Learn the ins and outs of a full-stack developer life in this post.
Thanks and see you soon!
