
Are you new to React and want to know how you can start your own React app in terminal?
If that is the case, then this blog will explain to you how to start your React app in terminal.
You will know the tools needed for your React app before you create a project. Also, you will know some other parts that come with your react project.
Let’s learn how to start react app in terminal!!

What Will You Learn?
Introduction
React has quickly become the go-to JavaScript library for developers seeking to build responsive, high-performing user interfaces.
With React’s component-based architecture, you can create complex web applications that deliver seamless, interactive experiences without page reloads—an essential for modern, single-page apps (SPAs).
In this guide, you’ll learn how to set up your first React app directly from the terminal, taking advantage of key tools like Node.js, npm, and the create-react-app utility to streamline the process.
Getting Started
To create a new React app, developers must have a few tools installed on their system.
First, Node.js must be installed to manage the server-side aspects of React.
Along with Node.js, npm, which is a package manager that comes with Node.js, is used to install libraries and tools required in a React project.
It’s also important to have a code editor, like Visual Studio Code, ready for developing your new app.
How To Start React App in Terminal
Setting Up The Project Folder Using create-react-app
To start a new react app, open your command line or terminal. Navigate to the directory where you want your project folder to be located.
Use the npx create-react-app command followed by your project name to create a new app. This command sets up the initial project structure and installs the necessary dependencies to get started.
npx create-react-app firstappTo learn more about create-react-app here.
Feel free to replace firstapp with any project name of your choice.
React Project Folder Structure
Change directories into the app you just created by cd command,
cd firstappand open the app using the text editor of your choice. You should see the following file structure:
myfirstreactapp
├── node_modules
├── public
│   ├── favicon.ico
│   ├── index.html
│   ├── logo192.png
│   ├── logo512.png
│   ├── manifest.json
│   └── robots.txt
├── src
│   ├── App.css
│   ├── App.js
│   ├── App.test.js
│   ├── index.css
│   ├── index.js
│   ├── logo.svg
│   ├── serviceWorker.js
│   └── setupTests.js
├── .gitignore
├── package.json
├── package-lock.json
└── README.md
.gitignore
This is the standard file used by the source control tool git to determine which files and directories to ignore when committing code.
package.json
This file outlines all the settings for the React app.
node_modules
This directory contains dependencies and sub-dependencies of packages used by the current React app, as specified by package.json. If you take a look, you may be surprised by how many there are.
package-lock.json
This file contains the exact dependency tree installed in node_modules/. This provides a way for teams working on private apps to ensure that they have the same version of dependencies and sub-dependencies.
public
This directory contains assets that will be served directly without additional processing by webpack. index.html provides the entry point for the web app. You will also see a favicon (header icon) and a manifest.json.
src
This contains the JavaScript that will be processed by webpack and is the heart of the React app. Browsing this folder, you see the main App JavaScript component (App.js), its associated styles (App.css), and the test suite (App.test.js). index.js and its styles (index.css) provide an entry into the App and also kick off the registerServiceWorker.js.
Run React App In Terminal
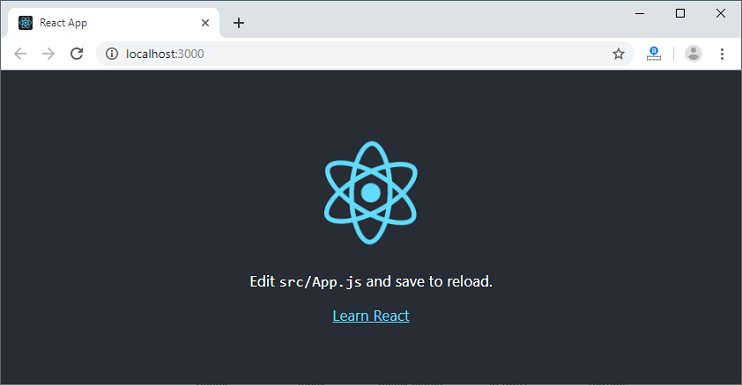
To start the react app, you can use npm start command in the terminal:
npm startIt will open a page like the following:
Create a React Project using vite
Nowadays developers use Vite more than create-react-app because of its faster execution and better configurations.
Now, you will see how to start react app in terminal that was built using vite.
To build the project, use npm create vite@latest command.
If you want to explore Vite in more detail, then check out their official page.
After you enter the command, it will ask for the name of the project. You can put any name of your choice.
? Project name: » vite-projectThen it will give you options for frontend tools that you want to use in your project. Choose React for this project (use up/down buttons to choose options).
Select a framework: » - Use arrow-keys. Return to submit.
>   Vanilla
    Vue
    React
    Preact
    Lit
    Svelte
    Solid
    Qwik
    Angular
    Others
Then it will ask for the language that you want to use (Typescript/Javascript).
? Select a variant: » - Use arrow-keys. Return to submit.
>   TypeScript
    TypeScript + SWC
    JavaScript
    JavaScript + SWC
    React Router v7 ↗
Choose Javascript here.
Then, it will create the react project for you.
Change the working directory to your project folder.
cd first-react-appInstall the dependencies needed for the project:
npm installNow, you can run the development server by:
npm run dev VITE v6.0.7 ready in 309 ms
➜ Local: http://localhost:5173/
➜ Network: use --host to expose
➜ press h + enter to show helpIt will not automatically open in the browser, but you can manually go to http://localhost:5173/ or CTRL + Click on the link in the terminal.
Conclusion
Knowing how to start react app in the terminal is just the beginning of what you can achieve with this powerful library.
With React’s component-based structure, you have the flexibility to build anything from static content-rich websites to interactive, data-driven applications that manage complex backend logic.
If you want to build your own static website in React then learn these 3 essentials in React using a project that will help you build any project in the future with ease.